BLOGGER TEMPLATES AND TWITTER BACKGROUNDS

Tuesday, July 16, 2013

I fibbed...

That's what I did when I said I wasn't sure if I had anymore projects left in me for a while! I indeed did have a few more projects I was able to start and complete. I seriously feel like Martha Stewart these days... If you read the post about our new home, you saw that there were three windows that needed a shade {the kitchen, our bathroom, and Baby S's/the guest bathroom}. I had intended on buying fabric and getting my mom to whip up a shade for each window. I found fabric that I liked at Hobby Lobby{trying to be as cost effective as I could}, but it was still going to cost around $40.00 a window. Now, I know that is CHEAP in reality, let's be real--nice window treatments are hundreds of dollars per window. I will have to wait a while before I can afford that, though! Anyway, we are in the present, not the future.  And $40.00 a window is still not ideal if it can be helped.

Soooo...I decided to search Pinterest until I found a no-sew roman shade I felt comfortable doing myself.  Since we already have blinds I didn't really need a "working" shade-- just something for looks. Lucky me, I found something I knew I could do! This is the one that caught my eye. I made a quick trip to Hancock Fabrics in search of inexpensive fabric that I could use to recreate what I found on Pinterest. I quickly found the burlap section--they had a great selection of burlap for only $5.99/yd. and it was on sale for 30% off--cha-ching!

I chose this really cool yellow/lime greenish burlap for the kitchen. I had jute/twine rope at home that was perfect for tying the shade up. The kitchen window is in a weird place because the cabinets butt up to the window with only about an inch to spare. There was no {easy}way to get a curtain rod in the space. I had some nailhead type pushpins that worked great for hanging this little shade. Total cost of this window treatment=a little over $4.00. I like it!
Next, I made the shade for our bathroom. I chose the "natural" burlap color for this one. I bought two spools of lace to tie it up. Then I stopped at Ross and got a very inexpensive curtain rod. All I had to do was create a rod pocket using hot glue--took less than 5 minutes. Britt hung the curtain rod, then I slipped the shade on it. I used the lace to tie the shade. Britt isn't crazy about the lace, because he thinks it's too girly. We shall see if I find something he likes better. Total cost of this shade {including the curtain rod}= a little over $14.00. Not bad! 
Another view...
 
Last, I whipped up a shade for the baby's/guest bathroom. I went with the same natural burlap color as our bathroom. There was already a curtain rod in the bathroom when we moved in, so all I had to do was buy a yard of fabric and some type of cording {not really sure what to call what it} to tie it up. I used the hot glue gun to create a rod pocket, and in less than 5 minutes, this shade was finished too. Total cost=right at $11.00. 
 
The last thing I {actually Britt} did was recover the chair we found at Scott Antique Market last Saturday. The chair was exactly what I was looking for; the seat just needed to be recovered. On the same trip to Hancock for window treatment fabric, I found the perfect fabric for the chair. It was on sale for $6.00/yd. I snatched it up quickly! All Britt had to do was unscrew the seat, staple the new fabric on the seat cushion, and put the seat back in the chair. This took all of 15-20 minutes. 
All of the supplies we needed...fabric, fabric scissors, a staple gun and staples.
I'm loving how it turned out! 
These projects are seriously the last ones for a while! I don't even think there is anything else to do in our house {aside from hanging the last pictures that need frames}! 

Much love--jess&britt

Saturday, July 13, 2013

Home is Wherever I'm With You...


That's how the saying goes. Home is most certainly wherever I am with Britt. We thought home was Birmingham, but turns out we were mistaken! Now, we call Atlanta home {most of you already know that}.  I had requests from family and some friends to make sure to share pictures of our new home once we got all settled in. This post is dedicated solely to that--pictures of our new home. Now that we have been here for 3 weeks and everything is pretty much in its place, I will take you on a "virtual tour".  I hope not to bore you too badly...

We live in a duplex, not a side-by-side one, but an upstairs-downstairs one. We live in the bottom unit of the duplex. You walk down the sidewalk and enter our deck. We got new{to us} patio furniture off of Craigslist, and the space turns out to be a very quaint little spot for us to enjoy the outdoors.
This is what you see when you walk up. 
I love this picture with the Auburn flag flying high in the wind...makes me ready for football season! 
And our front entrance...the door used to be an awful wood color and the light was a yucky flood light. The landlord had the door painted for us, and we bought a new light at Home Depot for about 40 bucks. Made all the difference in the world. I wish I had a before and after.
Once you walk into the house you are in the living/dining area. I was worried at first that our belongings would not all fit in here, but everything fits perfectly.
Looking straight in from the front door.
Different angle. 
 Can't have a home without a bar. 
This sort of separates the dining and living area...
 
Self explanatory.
One view of the living room...
 
Another view of the living room. We have to do something about that chair. The arms are ripped up so badly. Perhaps a reupholstering job would do the trick!
And I can't forget our Friends-inspired frame around the door! 
The kitchen is right with the living/dining area. I LOVE our kitchen  because it seems to be twice the size of our old kitchen. I also love the fact that the kitchen is open to the rest of the living space.  Since I spend so much time in this room it is nice to not feel closed off from the rest of the house when I'm doing my thing in there!  We also have about triple the amount of cabinet space.  When I was unpacking boxes I found myself trying to fit all of our small appliances in one cabinet. Britt had to remind me that we had other cabinets that had  not been used! One thing I had reserves about was the stove because it is electric. I have grown to love cooking with gas, so I was worried that cooking with an electric stove would be tough to get used to. Turns out, it's not terribly horrible {I still like gas better, but you work with what you have}.
Once side of the kitchen.
Close up of my favorite part of the kitchen. The decanters are great because we don't have a pantry, and they cut back on the amount of space needed for food storage. Britt stumbled upon this site and found our cool beef and pork prints. 
Other side of the kitchen. {The window is waiting on a roman shade once I buy the fabric}
Different angle. 
Check out ALL of that counter space {something we did not have in our old kitchen}; it's not really much, but it is more than we are accustomed to!
 This little gem hangs above our sink. I found it at Smith's before we left Birmingham and knew I HAD to have it. Sums up why I'm thankful to be a southern belle! 
Here's a look down our hallway--from the living area to the bedrooms and from the bedrooms going back to the living area.
Off of the hallway are our two bathrooms and laundry room.

Like the kitchen, our bathroom is about twice as big {if not bigger} than our old bathroom.

Looking straight into our bathroom. That big empty wall space has some pretty antique botanical prints waiting to be framed and hung! And the window is waiting on a roman shade whenever I buy the fabric.
On top of our spacious bathroom, we have a spare bathroom! We plan to use it as the guest/baby's bathroom. It's so narrow it's hard to capture it in a picture. {My mom is going to make a roman shade whenever I get around to buying the fabric!}
My sister made fun of me for calling our laundry area a "room". But let me assure you--it is a room compared to our last laundry area. In our old house, the washer and dryer were stacked on top of each other in the kitchen--yuck. So to us, this is a laundry room!
We got these cute curtains at Target since there was no door on the laundry room.
We used contact paper on the back wall to give it a more appealing look {if I have to do laundry I want it to look cute}. The always trusty Hobby Lobby had the laundry signs that hang up top. Target had baskets on sale that serve as extra storage. I had extra burlap in my arts and crafts bin and rigged these little curtains up. They need to be ironed, but oh well! They cover up more "stuff" that we have--tool box, laundry detergent, and probably just crap that we don't really have a place for.
The storage rack on the left used to be in our pantry. We don't have a pantry now, but it works great for storing paint and such.
This nifty little thing was already installed. It is nice to have the broom, mop, swiffer, etc. all hanging up and not just propped in a corner. 
Last stop on the tour is our bedroom. We got a new headboard thanks to Debbie and Al! It is the perfect headboard to compliment our bedding. I have always wanted an upholstered headboard with nail heads, and now we have one!
Looking into our room.
I realize there is one room I didn't share...the nursery. I will share it when everything is complete {hopefully soon, since this baby will be here in approximately 6 weeks}!

So, that's it, our house is now a home...we're just waiting on our sweet baby to make it complete!
Love--j&b

Tuesday, July 9, 2013

Re-use, Re-do, Re-purpose

Do it yourself. That is the "in" thing to do right now.  It's cost effective and gratifying all at the same time. Well, people, I have done it myself a lot lately. A couple of things needed to be done. And some other projects were just for fun. I'm almost 99% positive I am finished with projects for the next long while! Here is what I have been up to for the last 2 weeks...

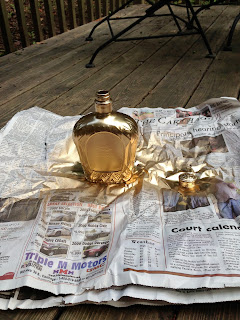
The first thing I did was repurpose a Crown Royal bottle. I found this little project on Pinterest. Britt likes Crown, so we always keep some in our liquor collection. All I had to do was paint and distress the bottle and I have a pretty knick knack sitting in my kitchen. {The tutorial calls for chalk paint, but I used regular paint from Home Depot and it looks juts as good to me.}
Spray paint one good coat of metallic gold.
Brush on your choice of paint color. Mine needed two coats. 
Let it dry.
I used a medium steel wool pad for the distressing. 
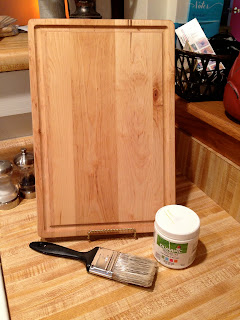
The next project was Pinterest inspired, but I put my own spin on it. I saw a tablet {iPad} holder for the kitchen--to rest your iPad with your Pinterest recipes pulled up, duh. Someone had taken a cutting board and added a ledge for the tablet to sit on. We don't have an iPad right now, but hopefully we will get one for Christmas. In the mean time, I will use my creation for a good, old-fashioned cookbook when I'm working in the kitchen. I ordered a wooden cutting board from Bed Bath & Beyond, we bought a dowel from Home Depot, I used left over paint from the nursery, and ordered a cool monogram decal from momogramart.com.
Paint cutting board with two coats of paint. 
Once paint is dry, screw in dowels.
Add a monogram decal, and wah-la! I've since used this and it serves its purpose well!
Next on my list of things to do was find something to hang over our grill on our deck. I looked all over for some type of wrought iron wall decor, but anything I found that I actually liked cost a fortune. I'm not into paying a lot for things right now considering our circumstances, but the OCD in me needs everything house-related to be finished. I just can't explain it. I can't handle unfinished-ness in our home! Britt's parents have been storing a lot of our and Kelsey's belongings in their basement. Since we are now in Atlanta and Kelsey moved into her own apartment, Britt's dad cleaned out the basement and made us all come over to see if there was ANYTHING we wanted to keep. If not, he's giving it away--I don't blame him! The point of this story is that I found something in the basement that I could use to hang over the grill--an old window. It was one I had actually given to Kelsey a few years ago. She doesn't use it anymore, so I might as well take it back, right?! I brought it home, went to Michael's and bought some Martha Stewart glass paint, and came home and painted the glass panes. Now it is hanging over our grill, and our deck is complete. Thank goodness!
Have you ever bought a piece of furniture with the intensions of redoing it? Who hasn't? I know I have. I bought a wicker night stand when I was still in college at a consignment shop. It was white, and I knew I could paint it to give it a better look. I think I paid $20 or $30 dollars for it. For whatever reason, I never got around to painting it. Perhaps I'm not  a huge fan of painting wicker. Who knows. Anyway, once we moved and I was cranking out projects like it was my business I decided there's no finer time than now to paint that bad boy. I went to Home Depot and bought a bottle of Rust-Oleum spray paint, satin nutmeg, to be exact. I came home and painted the nightstand in no time. {One bottle wasn't quite enough so I ran back to Home Depot and got one more--that did the trick.} I say it every time, but it amazes me what a good coat of paint can do for a piece of furniture. I love how it turned out!
I forgot to take a picture of it before I started, whoops! 
The finished product!

Whew, last one. I found this shelf on Pinterest and wanted it so badly for our baby's nursery. I got the bright idea that Britt and his Granddaddy could build it for me. They could have, but once we started drawing plans and calculating what supplies would cost, it seemed silly to try and recreate the shelf. Instead, we went on a hunt for something similar {that didn't cost an arm and a leg}. I expected to search forever to find the perfect shelf, but thankfully in one Saturday and after visiting only two antique/consignment stores we found a winner. It was in our price range, and it was on sale. Score! We had leftover Annie Sloan chalk paint from two previous projects {Britt can no longer complain about the high cost of the ASCP because we completed three projects with that one quart of paint!}. We used it to paint the shelf, and I think it turned out beautiful.
Blah.
So much prettier! 
What's left of our ASCP...just enough for possibly needed touchups! 
I'm not sure I have anymore projects left in me--at least not for a while. Perhaps this was part of my "nesting". I am just relieved that everything is finished and all of the crafting supplies are put away and out of site for a while. I truly get a sense of satisfaction from doing projects. I hope I inspired you to do something crafty soon. There's bound to be something in your house that can be repurposed or redone! 

Happy crafting--Jess